Page 1 of 1

Aplicacion inicial

PostPosted: Mon May 25, 2015 4:34 pm
by cnavarro
Compañeros
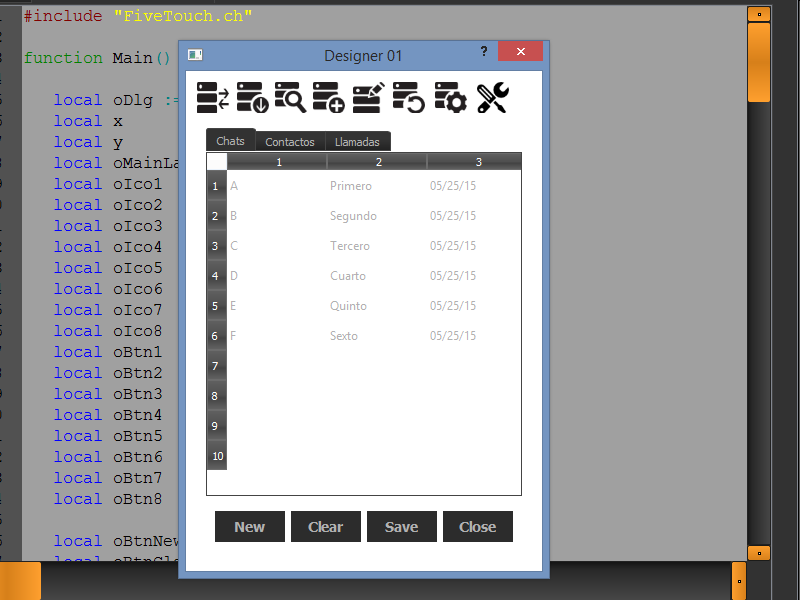
Aqui dejo un pequeño programa
Mi intencion es que me ayuden a ir ampliandolo poco a poco

Code: Select all  Expand view

#include "FiveTouch.ch"

function Main()

   local oDlg := QDialog()
   local x
   local y
   local oMainLayout   := QVBoxLayout()
   local oIco1
   local oIco2
   local oIco3
   local oIco4
   local oIco5
   local oIco6
   local oIco7
   local oIco8
   local oBtn1
   local oBtn2
   local oBtn3
   local oBtn4
   local oBtn5
   local oBtn6
   local oBtn7
   local oBtn8

   local oBtnNew
   local oBtnClear
   local oBtnSave
   local oBtnEdit
   local oBtnClose

   local oButtonBar
   local oButtonBarLayout
   local oSuperLayout     := QVBoxLayout()
   local oCenterLayout
   local oInferLayout    // := QHBoxLayout()
   local oFolder          := QTabWidget()
   local oCenter
   local oFold1
   local oFold2
   local oFold3
   local oBar
   local oVarsList
   local oBrw
   local oModel
   local aValores     := { { "A","Primero" , Dtoc(Date()) },;
                           { "B","Segundo" , Dtoc(Date()) },;
                           { "C","Tercero" , Dtoc(Date()) },;
                           { "D","Cuarto"  , Dtoc(Date()) },;
                           { "E","Quinto"  , Dtoc(Date()) },;
                           { "F","_"   , Dtoc(Date()) } }
 
   oDlg:SetStyleSheet( "background-color: rgba( 255, 255, 255, 255 );border: 0px solid white;" )
   oButtonBar       := QWidget()
   oButtonBarLayout := QHBoxLayout()
   oDlg:SetLayout( oMainLayout )

   oDlg:SetLayout( oSuperLayout )
   //oDlg:SetLayout( oCenterLayout )
   //oDlg:SetLayout( oInferLayout )

   oDlg:SetWindowTitle( "Designer 01" )

   oButtonBarLayout := QHBoxLayout()
   oDlg:SetLayout( oButtonBarLayout )   

   oBar := QToolBar()
   oBar:SetStyleSheet( "background-color: rgba( 255, 255, 255, 255 );spacing: 0px;border-radius: 0px;" )
   oMainLayout:AddWidget( oBar )

   oBar:AddWidget( oBtn1 := QPushButton() ) 
   oBar:AddWidget( oBtn2 := QPushButton() ) 
   oBar:AddWidget( oBtn3 := QPushButton() ) 
   oBar:AddWidget( oBtn4 := QPushButton() ) 
   oBar:AddWidget( oBtn5 := QPushButton() ) 
   oBar:AddWidget( oBtn6 := QPushButton() ) 
   oBar:AddWidget( oBtn7 := QPushButton() ) 
   oBar:AddWidget( oBtn8 := QPushButton() ) 

   oBtn1:SetStyleSheet( "background-color: rgba( 255, 255, 255, 255 );border: 0px solid red;min-width: 30px;" )
   oIco1 = QLabel( oBtn1 )
   //oIco1:Move( 2, 1 )
   oIco1:SetPixmap( QPixmap( "g3749.png" ) ) //threelines.png" ) )

   oBtn2:SetStyleSheet( "background-color: rgba( 255, 255, 255, 255 );border: 0px solid red;min-width: 2em;" )
   oIco2 = QLabel( oBtn2 )
   oIco2:SetPixmap( QPixmap( "g4023.png" ) )

   oBtn3:SetStyleSheet( "background-color: rgba( 255, 255, 255, 255 );border: 0px solid red;min-width: 2em;" )
   oIco3 = QLabel( oBtn3 )
   oIco3:SetPixmap( QPixmap( "g4033.png" ) )

   oBtn4:SetStyleSheet( "background-color: rgba( 255, 255, 255, 255 );border: 0px solid red;min-width: 30px;" )
   //oBtn4:SetText( "FiveTouch" )
   oIco4 = QLabel( oBtn4 )
   oIco4:SetPixmap( QPixmap( "g3991.png" ) )

   oBtn5:SetStyleSheet( "background-color: rgba( 255, 255, 255, 255 );border: 0px solid red;min-width: 30px;" )
   oIco5 = QLabel( oBtn5 )
   oIco5:SetPixmap( QPixmap( "g3893.png" ) )

   oBtn6:SetStyleSheet( "background-color: rgba( 255, 255, 255, 255 );border: 0px solid red;min-width: 32px;" )
   oIco6 = QLabel( oBtn6 )
   oIco6:SetPixmap( QPixmap( "g3883.png" ) )

   oBtn7:SetStyleSheet( "background-color: rgba( 255, 255, 255, 255 );border: 0px solid red;min-width: 32px;" )
   oIco7 = QLabel( oBtn7 )
   oIco7:SetPixmap( QPixmap( "g3771.png" ) )

   oBtn8:SetStyleSheet( "background-color: rgba( 255, 255, 255, 255 );border: 0px solid red;min-width: 32px;" )
   oIco8 = QLabel( oBtn8 )
   oIco8:SetPixmap( QPixmap( "g653.png" ) )

   //// oBtn1:SetStyleSheet( "background-image: url('./threelines.jpg');" )
   oCenter    := QWidget()
   oCenter:SetLayout( oSuperLayout )
   oMainLayout:AddWidget( oCenter )  
   oCenter:SetStyleSheet( "background-color: rgba( 255, 255, 255, 200 );border: 0px solid white;" )
   oSuperLayout:AddWidget( oFolder )
   oFolder:AddTab( oFold1 := QWidget(), "Chats" )
   oFolder:AddTab( oFold2 := QWidget(), "Contactos" )
   oFolder:AddTab( oFold3 := QWidget(), "Llamadas" )
   oFolder:SetStyleSheet( "background-color: rgba( 255, 255, 255, 200 );border: 0px solid white;" )  
   //oFolder:setTabEnabled( 2, .F.)

   oBrw := QTableView( oFolder:CurrentWidget )
   oBrw:setStyleSheet( "background-color: rgba( 255, 255, 255, 200 );border: 0px solid white;" )
   oBrw:setshowgrid( .F. )
   //oBrw:setRowHeight(int row, int height)
   //oBrw:setColumnWidth(0, 10)
   oModel := QStandardItemModel( 10, 3, oFolder:CurrentWidget )
   //oModel:SetHorizontalHeaderItem( 0, QStandardItem( "Id" ) )
   //oModel:SetHorizontalHeaderItem( 1, QStandardItem( "Contact" ) )
   //oModel:SetHorizontalHeaderItem( 2, QStandardItem( "Date" ) )
   //oModel:takeHorizontalHeaderItem( 0 )
   //oModel:takeVerticalHeaderItem( 0 )
   For x = 1 to Len( aValores )
       For y = 1 to Len( aValores[ x ] )
       oModel:SetItem( x-1, y-1, QStandardItem( aValores[ x, y ] ) )
       Next y
   Next x
   oBrw:SetModel( oModel )
   //oBrw:clearSpans()
   oBrw:Resize( 314, 400 )

   oSuperLayout:AddWidget( oButtonBar )
   oButtonBar:SetLayout( oButtonBarLayout ) 
   oButtonBar:SetStyleSheet( "background-color: rgba( 255, 255, 255, 200 );border: 0px solid;spacing: 0px" )
   oButtonBarLayout:AddWidget( oBtnNew := QPushButton() )   
   oBtnNew:SetText( "New" ) 
   oBtnNew:SetStyleSheet( "background-color: rgba( 10, 10, 10, 220 );border: 0px solid white;font: bold 14px;border-radius: 0px;spacing: 0px;" )
   oButtonBarLayout:AddWidget( oBtnClear := QPushButton() ) 
   oBtnClear:SetText( "Clear" )
   oBtnClear:SetStyleSheet( "background-color: rgba( 10, 10, 10, 220 );border: 0px solid white;font: bold 14px;border-radius: 0px;spacing: 0px;" )
   //oButtonBarLayout:AddWidget( oBtnEdit := QPushButton() )   
   //oBtnEdit:SetText( "Edit" )
   //oBtnEdit:SetStyleSheet( "background-color: rgba( 10, 10, 10, 220 );border: 0px solid white;font: bold 14px;border-radius: 0px;spacing: 0px;" )
   oButtonBarLayout:AddWidget( oBtnSave := QPushButton() ) 
   oBtnSave:SetText( "Save" )
   oBtnSave:SetStyleSheet( "background-color: rgba( 10, 10, 10, 220 );border: 0px solid white;font: bold 14px;border-radius: 0px;spacing: 0px;" )
   oButtonBarLayout:AddWidget( oBtnClose := QPushButton() ) 
   oBtnClose:SetText( "Close" )
   oBtnClose:SetStyleSheet( "background-color: rgba( 10, 10, 10, 220 );border: 0px solid white;font: bold 14px;border-radius: 0px;spacing: 0px;" )
   oBtnClose:Connect( "clicked()", { || oDlg:End() } )

   oDlg:Resize( 300, 500 )
   oDlg:Exec()

return nil             


Aqui dejo los pngs que hacen falta
https://www.dropbox.com/s/tx3vobgxiq01f ... s.zip?dl=0

Image

Re: Aplicacion inicial

PostPosted: Mon May 25, 2015 10:28 pm
by Antonio Linares
Cristobal,

Muy bueno!

Muchas gracias! :-)

Re: Aplicacion inicial

PostPosted: Wed Jun 03, 2015 11:55 pm
by jnavas
Cristóbal
Excelente trabajo, pase dias buscando la asignacion de colores, recomiendo que empecemos construir un manual de desarrollo. Puedo aportar algunas de las funcionalidades que pude investigar.

Re: Aplicacion inicial

PostPosted: Thu Jun 04, 2015 1:54 am
by Jairo Barbosa
Juan que bueno que participes con tus aportes

Quiero hacerte una pregunta.

En el editor de Fivetouch en fondo de los ejemplos es de color negro y letras blancas, tu de pronto me puedes dar la manos para cambiar el color de fondo y el de los textos
Cambio facil los tamaños y los tipos de letra.

Tan pronto le de un poco mas de forma al proyecto lo publicare en este foro

un Abrazo

Jairo

Re: Aplicacion inicial

PostPosted: Thu Jun 04, 2015 8:55 am
by cnavarro
Juan, Jairo, esa es la idea, ir entre todos añadiendo detalles y funcionalidad.
La idea es hacer un pequeño manual práctico con el desarrollo de la aplicacion
Saludos

Re: Aplicacion inicial

PostPosted: Thu Jun 11, 2015 5:40 am
by jnavas
Cristóbal,
Encontré esta documentación:

http://choccac.com/?wpfb_dl=1

TEMA!22
BASES!DE!DATOS
La!gran!mayoría!de!aplicaciones!de!gestión,!suelen!guardar!toda!la!ingente!cantidad!de!
datos!que!maneja!en!un!motor!de!base!de!datos.!Qt!en!su!versión!privativa!incluye!los!drivers!de!
la!mayoría! de!motores! de! datos.!Qt!en! su! versión!Open!Source,! no!incluye!aquellos! que! tienen!
licencia.! Para! aquellos! usuarios! acostumbrados! a! usar! la! sintaxis! SQL,! Qt! provee! de! la! clase!
QSqlQuery.!Para!usuarios!que!prefieren!evitar!esto,!y!desean!trabajar!a!un!nivel!más!alto,!hay!2!
modelos! incluidos! en! las! clases! QSqlTableModel! y! QSqlRelationalTableModel,! las! cuales! ya!
mencionamos!en!el!tema!16.
Conectar!e!interrogar!con!SQL
Vamos! a! empezar! tratando! la! primera! forma! de! trabajar! con! bases! de! datos,! donde!
conectaremos!con!una!base!de!datos!MySQL,!y!la!interrogaremos!mediante!la!sintaxis!SQL.!
bool createConnection()
{
QSqlDatabase db = QSqlDatabase::addDatabase("QMYSQL");
db.setHostName("localhost");
db.setDatabaseName("megafonia");
db.setUserName("root");
db.setPassword("admin");
if (!db.open()) {
QMessageBox::critical(0, QObject::tr("Database Error"),db.lastError().text());
return false;
}
return true;
}
Esta!es!una!conexión!a!la!base!de!datos!MySQL,!en!el!host!local,!con!nombre!megafonia,!
con!el!usuario!y!password!del!usuario!que!tenga!acceso!a!la!misma,!de!acuerdo!a!las!queries!SQL!
que!vamos!a!enviarle.
Lo!siguiente!será!enviarle!una!query,!y!esto!se!hace!así:
QSqlQuery query;
query.exec("SELECT almacen, ntiendas FROM almacenes");
while (query.next()) {
QString almacen = query.value(0).toString();
int ntiendas = query.value(1).toInt();
qDebug("Nombre: %s - Tiendas: %d",qPrintable(almacen),ntiendas);
}
Como!puedes!ver!la!función!exec()!ejecuta!el!query,!next()!recorre!el!puntero!por!la!tabla!
respuesta,! y! value!es!una!lista!QVariant,!donde!los!campos! tienen!índices!del!0!en!adelante,!de!
esta!forma!value(0)!contendría!el!campo!almacen!que!es!el!primero!en!la!respuesta,!y!en!value(1)!
estaría!el!campo!ntiendas.
Para!que!este!código!compile!bien,!es!necesario!que!se!añada!el!módulo!sql!al!proyecto,!
es!decir!al!fichero!*.pro!con!la!linea:
QT!+=!sq

Re: Aplicacion inicial

PostPosted: Thu Jun 11, 2015 7:25 am
by cnavarro
jnavas wrote:Cristóbal,
Encontré esta documentación:

http://choccac.com/?wpfb_dl=1


Muy bueno, gracias

Re: Aplicacion inicial

PostPosted: Wed Oct 17, 2018 1:43 am
by vilian
Cristóbal,
Your App is really nice, but the majority of the code is not fivewin! There are a lot of functions that I don't know!
I'm thinking Fivetouch would allow us developer apps using the syntax we already know. Isn't it ?

Re: Aplicacion inicial

PostPosted: Wed Oct 17, 2018 2:38 am
by cnavarro
vilian wrote:Cristóbal,
Your App is really nice, but the majority of the code is not fivewin! There are a lot of functions that I don't know!
I'm thinking Fivetouch would allow us developer apps using the syntax we already know. Isn't it ?


Dear Vilian, no
Look fivetouch.ch
Fivetouch run equal as fivewin
Sample of commands Fivetouch.ch

Code: Select all  Expand view


#define FTVERSION 1.0

#define CRLF hb_eol()

#command ? [ <list,...> ] => ConsoleOut( [ { <list> } ] )

#xcommand TEXT INTO <v> => #pragma __cstream|<v>:=%s

#xcommand DEFINE WINDOW <oWnd> ;
             [ TITLE <cTitle> ] ;
             [ COLOR <nRGBColor> ] ;
       => ;      
             <oWnd> := QDialog() ;;
             <oWnd>:ShowMaximized() ;;               
             [; <oWnd>:SetWindowTitle( IfNil( <cTitle>, "FiveTouch" ) ) ] ;
             [; <oWnd>:SetColor( IfNil( <nRGBColor>, nRgb( 255, 0, 0 ) ) ) ] ;;
             <oWnd>:ShowMaximized()              
             
#xcommand ACTIVATE WINDOW <oWnd> ;
             [ ON INIT <uInit> ] ;               
       => ;
          [ Eval( <{uInit}> ) ] ;;
          <oWnd>:Exec()          

#xcommand DEFINE DIALOG <oDlg> ;
             [ SIZE <nWidth>, <nHeight> ] ;
             [ TITLE <cTitle> ] ;
       => ;      
             <oDlg> := QDialog() ;
             [; <oDlg>:SetWindowTitle( IfNil( <cTitle>, "FiveTouch" ) ) ] ;
             [; <oDlg>:ReSize( IfNil( <nWidth>, 400 ), IfNil( <nHeight>, 300 ) ) ]
 
#xcommand ACTIVATE DIALOG <oDlg> ;
             [ <center: CENTER, CENTERED> ] ;
       => ;
          [ <oDlg>:Center( <.center.> ) ;] ;         
          <oDlg>:Exec()  


In my example, I have used the functions directly (as if it were the generated .ppo file, without using commands), but you can use the commands or create your own commands and add them to fivetouch.ch, as you need it (as we do in Fivewin)

Re: Aplicacion inicial

PostPosted: Thu Oct 18, 2018 11:51 am
by vilian
Cristóbal,

Do you know how to use this function http://doc.qt.io/archives/qt-4.8/sql-connecting.html with Fivetouch ?

Re: Aplicacion inicial

PostPosted: Fri Oct 19, 2018 4:25 pm
by cnavarro