Page 1 of 1

colorize btnbmp with diagonal

Posted: Mon Apr 15, 2024 12:07 pm
by Silvio.Falconi
I tried a test I found on this forum

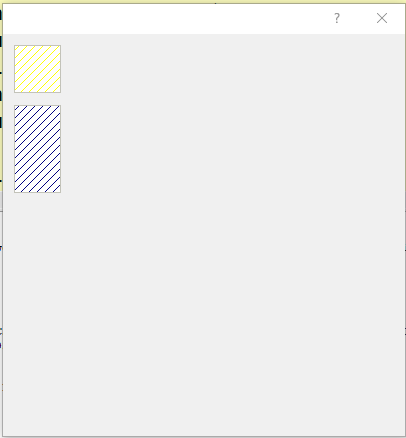
Image

Code: Select all | Expand

 
#include "fivewin.ch"

// colorize btnbmp with diagonal

Function test()
local oDlg
local oBtn
local lmenu:=.f.

DEFINE DIALOG oDlg SIZE 400,400

@  10, 10 BTNBMP    oBtn  SIZE 50, 50 PIXEL OF oDlg FLAT GDIP NOROUND  ; //
        RESOURCE "GRID_DWN_REC", "", LinesBmp(oBtn,50,50), "" ;
     ACTION NIL WHEN lmenu
        obtn:nClrBorder := RGB(195,195,185)

 @  70, 10 BTNBMP    oBtn  SIZE 50, 90 PIXEL OF oDlg FLAT GDIP NOROUND  ; //
        RESOURCE "GRID_DWN_REC", "", LinesBmp(oBtn,50,90), "" ;
     ACTION NIL WHEN lmenu
        obtn:nClrBorder := RGB(195,195,185)
ACTIVATE DIALOG oDlg
RETURN NIL
//---------------------------------------------------------//

Function LinesBmp(oControl,n1,n2)
   local hBmp, oBrush
   DEFINE BRUSH oBrush STYLE BDIAGONAL COLOR  Rgb(195,195,185)
   hBmp  := FW_MakeYourBitmap( n1,n2, <|hDC,w,h|
     FillRect( hDC, { 0,0,h,w }, oBrush:hBrush )
            return nil
            > )
            RELEASE BRUSH oBrush
    return hBm
I wish have all the area of button with diagonal
so how I must make to have it ?

Re: colorize btnbmp with diagonal

Posted: Mon Apr 15, 2024 2:10 pm
by karinha
Algo asi?

https://imgur.com/7TrVjPp

Image

Regards, saludos.

Re: colorize btnbmp with diagonal

Posted: Mon Apr 15, 2024 3:45 pm
by Silvio.Falconi
Yes

Re: colorize btnbmp with diagonal

Posted: Mon Apr 15, 2024 5:36 pm
by karinha
Listo:

Code: Select all | Expand

// C:\FWH\SAMPLES\SILVDIAG.PRG

#include "fivewin.ch"

// colorize btnbmp with diagonal

FUNCTION test()

   local oBtn, hBmp := LinesBmp()
   LOCAL oDlg, oBtn1, oBtn2, lMenu := .T., cTitle

   LOCAL nLarg1 := 095 // Largura
   LOCAL nAlt1  := 095 // altura

   LOCAL nLarg2 := 095 // Largura
   LOCAL nAlt2  := 170 // altura

   cTitle := "Colorize BTNBMP con DIAGONAL"

   DEFINE DIALOG oDlg SIZE 400, 400 TITLE cTitle TRANSPARENT

   oDlg:lHelpIcon := .F.

   @  10, 10 BTNBMP oBtn1 SIZE 50, 50 PIXEL OF oDlg FLAT GDIP NOROUND   ;
      RESOURCE "PREV", "", LinesBmp( oBtn1, nLarg1, nAlt1 ), "" ;
      ACTION NIL WHEN lMenu

   oBtn1:nClrBorder := RGB( 195, 195, 185 )

   @  70, 10 BTNBMP oBtn2 SIZE 50, 90 PIXEL OF oDlg FLAT GDIP NOROUND   ;
      RESOURCE "EXIT", "", LinesBmp( oBtn2, nLarg2, nAlt2 ), "" ;
      ACTION NIL WHEN lMenu

   oBtn2:nClrBorder := RGB( 195, 195, 185 )

   @ 150, 80 CHECKBOX lMenu PROMPT "Enabled" SIZE 80, 20 PIXEL OF oDlg

   ACTIVATE DIALOG oDlg CENTERED

RETURN NIL

FUNCTION LinesBmp( oControl, nDiag1, nDiag2 )

   LOCAL hBmp, oBrush

   // DEFINE BRUSH oBrush STYLE BDIAGONAL COLOR Rgb( 195, 195, 185 )

   // test:
   DEFINE BRUSH oBrush STYLE BDIAGONAL COLOR nRGB( 000, 100, 255 ) // nRGB( 255, 000, 035 )

   hBmp := FW_MakeYourBitmap( nDiag1, nDiag2, < | hDC, w, h |
      FillRect( hDC, { 0, 0, h, w }, oBrush:hBrush )
      RETURN NIL
      > )

   RELEASE BRUSH oBrush

RETURN( hBmp )

/* // SILVDIAG.RC
ico  ICON ".\.\..\ICONS\fivewin.ico"

#ifndef __64__
  1 24 "WinXP\WindowsXP.Manifest"
#endif

#ifdef __64__
  1 24 "WinXP\WindowsXP.Manifest64"
#endif

new      BITMAP .\..\bitmaps\32x32\new.bmp
open     BITMAP .\..\bitmaps\32x32\open.bmp
copy     BITMAP .\..\bitmaps\32x32\copy.bmp
prev     BITMAP .\..\bitmaps\32x32\previous.bmp
next     BITMAP .\..\bitmaps\32x32\next.bmp
exit     BITMAP .\..\bitmaps\32x32\exit.bmp
*/

// FIN / END
 
Regards, saludos.

Re: colorize btnbmp with diagonal

Posted: Mon Apr 15, 2024 11:35 pm
by Silvio.Falconi
karinha wrote:Listo:

Code: Select all | Expand

// C:\FWH\SAMPLES\SILVDIAG.PRG

#include "fivewin.ch"

// colorize btnbmp with diagonal

FUNCTION test()

   local oBtn, hBmp := LinesBmp()
   LOCAL oDlg, oBtn1, oBtn2, lMenu := .T., cTitle

   LOCAL nLarg1 := 095 // Largura
   LOCAL nAlt1  := 095 // altura

   LOCAL nLarg2 := 095 // Largura
   LOCAL nAlt2  := 170 // altura

   cTitle := "Colorize BTNBMP con DIAGONAL"

   DEFINE DIALOG oDlg SIZE 400, 400 TITLE cTitle TRANSPARENT

   oDlg:lHelpIcon := .F.

   @  10, 10 BTNBMP oBtn1 SIZE 50, 50 PIXEL OF oDlg FLAT GDIP NOROUND   ;
      RESOURCE "PREV", "", LinesBmp( oBtn1, nLarg1, nAlt1 ), "" ;
      ACTION NIL WHEN lMenu

   oBtn1:nClrBorder := RGB( 195, 195, 185 )

   @  70, 10 BTNBMP oBtn2 SIZE 50, 90 PIXEL OF oDlg FLAT GDIP NOROUND   ;
      RESOURCE "EXIT", "", LinesBmp( oBtn2, nLarg2, nAlt2 ), "" ;
      ACTION NIL WHEN lMenu

   oBtn2:nClrBorder := RGB( 195, 195, 185 )

   @ 150, 80 CHECKBOX lMenu PROMPT "Enabled" SIZE 80, 20 PIXEL OF oDlg

   ACTIVATE DIALOG oDlg CENTERED

RETURN NIL

FUNCTION LinesBmp( oControl, nDiag1, nDiag2 )

   LOCAL hBmp, oBrush

   // DEFINE BRUSH oBrush STYLE BDIAGONAL COLOR Rgb( 195, 195, 185 )

   // test:
   DEFINE BRUSH oBrush STYLE BDIAGONAL COLOR nRGB( 000, 100, 255 ) // nRGB( 255, 000, 035 )

   hBmp := FW_MakeYourBitmap( nDiag1, nDiag2, < | hDC, w, h |
      FillRect( hDC, { 0, 0, h, w }, oBrush:hBrush )
      RETURN NIL
      > )

   RELEASE BRUSH oBrush

RETURN( hBmp )

/* // SILVDIAG.RC
ico  ICON ".\.\..\ICONS\fivewin.ico"

#ifndef __64__
  1 24 "WinXP\WindowsXP.Manifest"
#endif

#ifdef __64__
  1 24 "WinXP\WindowsXP.Manifest64"
#endif

new      BITMAP .\..\bitmaps\32x32\new.bmp
open     BITMAP .\..\bitmaps\32x32\open.bmp
copy     BITMAP .\..\bitmaps\32x32\copy.bmp
prev     BITMAP .\..\bitmaps\32x32\previous.bmp
next     BITMAP .\..\bitmaps\32x32\next.bmp
exit     BITMAP .\..\bitmaps\32x32\exit.bmp
*/

// FIN / END
 
Regards, saludos.
certainly darling, but I wanted it automatically, I didn't want to insert the width and height of each button, if in a window I have 80 buttons all with different sizes, how many lines of source do you think I should write?

ciertamente cariño, pero lo quería automáticamente, no quería insertar el ancho y alto de cada botón, si en una ventana tengo 80 botones todos con diferentes tamaños, ¿cuántas líneas de fuente crees que debería escribir?

Re: colorize btnbmp with diagonal

Posted: Tue Apr 16, 2024 2:30 pm
by karinha
Teste e comente:

Code: Select all | Expand

// C:\FWH\SAMPLES\SILVDIAG.PRG - VERSION: 1.2 by Kapiaba.

#Include "FiveWin.ch"

STATIC oChkSil

// colorize btnbmp with diagonal

FUNCTION test()

   LOCAL oBtn, hBmp := LinesBmp(), oFont, cVersion := "Version: 1.2"
   LOCAL oDlg, oBtn1, oBtn2, oBtn3, oBtn4, oBtn5, oBtn6, oBtn7,              ;
         lMenu := .T., cTitle, oSalida

   LOCAL nLarg  := 095 // Largura
   LOCAL nAlt   := 095 // altura

   SET _3DLOOK ON

   SkinButtons()

   cTitle := "Colorize BTNBMP con DIAGONAL - " + cVersion

   DEFINE FONT oFont NAME "TAHOMA" SIZE 0, - 14

   DEFINE DIALOG oDlg SIZE 400, 450 TITLE cTitle TRANSPARENT FONT oFont

   oDlg:lHelpIcon := .F.

   @  10, 10 BTNBMP oBtn1 SIZE 50, 50 PIXEL OF oDlg FLAT GDIP NOROUND  ;
      RESOURCE "PREV", "", LinesBmp( oBtn1, nLarg, nAlt ), ""          ;
      ACTION NIL WHEN lMenu

   oBtn1:nClrBorder := RGB( 195, 195, 185 )

   // nLarg := nLarg +...
   nAlt := nAlt + 75

   @  70, 10 BTNBMP oBtn2 SIZE 50, 90 PIXEL OF oDlg FLAT GDIP NOROUND  ;
      RESOURCE "NEXT", "", LinesBmp( oBtn2, nLarg, nAlt ), ""          ;
      ACTION NIL WHEN lMenu

   oBtn2:nClrBorder := RGB( 195, 195, 185 )

   // nLarg := nLarg +...
   nAlt := nAlt - 75

   @  10, 70 BTNBMP oBtn3 SIZE 50, 50 PIXEL OF oDlg FLAT GDIP NOROUND  ;
      RESOURCE "PREV", "", LinesBmp( oBtn3, nLarg, nAlt ), ""          ;
      ACTION NIL WHEN lMenu

   oBtn3:nClrBorder := RGB( 195, 195, 185 )

   // nLarg := nLarg +...
   nAlt := nAlt + 75

   @  70, 70 BTNBMP oBtn4 SIZE 50, 90 PIXEL OF oDlg FLAT GDIP NOROUND  ;
      RESOURCE "NEXT", "", LinesBmp( oBtn4, nLarg, nAlt ), ""          ;
      ACTION NIL WHEN lMenu

   oBtn4:nClrBorder := RGB( 195, 195, 185 )

   // nLarg := nLarg +...
   nAlt := nAlt - 75

   @  10, 130 BTNBMP oBtn5 SIZE 50, 50 PIXEL OF oDlg FLAT GDIP NOROUND ;
      RESOURCE "PREV", "", LinesBmp( oBtn5, nLarg, nAlt ), ""          ;
      ACTION NIL WHEN lMenu

   oBtn5:nClrBorder := RGB( 195, 195, 185 )

   // nLarg := nLarg +-...
   nAlt := nAlt + 75

   @  70, 130 BTNBMP oBtn4 SIZE 50, 90 PIXEL OF oDlg FLAT GDIP NOROUND ;
      RESOURCE "NEXT", "", LinesBmp( oBtn4, nLarg, nAlt ), ""          ;
      ACTION NIL WHEN lMenu

   oBtn4:nClrBorder := RGB( 195, 195, 185 )

   @ 160, 80 CHECKBOX oChkSil VAR lMenu PROMPT "Enabled" SIZE 80, 14 PIXEL ;
      OF oDlg UPDATE // Cambiar color en el ON INIT.

   @ 165, 10 SAY "I Love FiveWin" OF oDlg SIZE 100, 12 PIXEL FONT oFont    ;
      COLORS METRO_PINK, CLR_WHITE TRANSPARENT UPDATE

   @ 185, 10 SAY "kapiabafwh@gmail.com" OF oDlg SIZE 120, 12 PIXEL         ;
      FONT oFont COLORS METRO_VIOLET, CLR_WHITE TRANSPARENT UPDATE

   @ 205, 010 BUTTON oSalida PROMPT "&Exit" SIZE 30, 12 PIXEL OF oDlg      ;
      ACTION( oDlg:End() ) CANCEL

   ACTIVATE DIALOG oDlg CENTERED  ;
      ON INIT CTRLS_COLORS( oDlg ) // Color in CheckBox

   oFont:End()

RETURN NIL

FUNCTION LinesBmp( oControl, nDiag1, nDiag2 )

   LOCAL hBmp, oBrush

   DEFINE BRUSH oBrush STYLE BDIAGONAL COLOR nRGB( 000, 100, 255 ) // nRGB( 255, 000, 035 )

   hBmp := FW_MakeYourBitmap( nDiag1, nDiag2, < | hDC, w, h |
      FillRect( hDC, { 0, 0, h, w }, oBrush:hBrush )
      RETURN NIL
      > )

   RELEASE BRUSH oBrush

RETURN( hBmp )
// By Giovanny Vecchi
FUNCTION CTRLS_COLORS( f_oDlgContainer )

   LOCAL lc_aCtrls := {}, lc_iFor := 0
   LOCAL lc_aItemsRadio := {}

   lc_aCtrls := f_oDlgContainer:aControls

   FOR lc_iFor := 1 TO Len( lc_aCtrls )

      IF ValType( lc_aCtrls[lc_iFor] ) == "O"

         IF lc_aCtrls[lc_iFor]:ClassName() == "TRADIO"

            aEval( lc_aCtrls[lc_iFor]:oRadMenu:aItems,                 ;
                   {|_oRadId|{ SetWindowTheme( _oRadId:hWnd, "", "" ), ;
                   _oRadId:SetColor( CLR_CYAN, CLR_WHITE ) } } )
                    
         ELSEIF lc_aCtrls[lc_iFor]:ClassName() == "TCHECKBOX"

            SetWindowTheme( lc_aCtrls[lc_iFor]:hWnd, "", "" )

            lc_aCtrls[lc_iFor]:SetColor( METRO_ORANGE, CLR_WHITE )

         ENDIF

      ENDIF

   NEXT

RETURN NIL

/* // SILVDIAG.RC
ico  ICON ".\.\..\ICONS\fivewin.ico"

#ifndef __64__
  1 24 "WinXP\WindowsXP.Manifest"
#endif

#ifdef __64__
  1 24 "WinXP\WindowsXP.Manifest64"
#endif

new      BITMAP .\..\bitmaps\32x32\new.bmp
open     BITMAP .\..\bitmaps\32x32\open.bmp
copy     BITMAP .\..\bitmaps\32x32\copy.bmp
prev     BITMAP .\..\bitmaps\32x32\previous.bmp
next     BITMAP .\..\bitmaps\32x32\next.bmp
exit     BITMAP .\..\bitmaps\32x32\exit.bmp
*/

// FIN / END - kapiabafwh@gmail.com
 
Regards, saludos.

Re: colorize btnbmp with diagonal

Posted: Tue Apr 16, 2024 2:36 pm
by karinha
https://imgur.com/wDGWLGO

Image

Regards, saludos.

Re: colorize btnbmp with diagonal

Posted: Wed Apr 17, 2024 8:28 am
by Silvio.Falconi
NO GOOD FOR ME
si tengo un diálogo con 80 botones (con diferentes medidas WxL) ¿cuántas líneas de código crees que debería escribir?

Re: colorize btnbmp with diagonal

Posted: Thu Apr 18, 2024 10:51 am
by nageswaragunupudi
Silvio.Falconi wrote:I tried a test I found on this forum

Image

Code: Select all | Expand

 
#include "fivewin.ch"

// colorize btnbmp with diagonal

Function test()
local oDlg
local oBtn
local lmenu:=.f.

DEFINE DIALOG oDlg SIZE 400,400

@  10, 10 BTNBMP    oBtn  SIZE 50, 50 PIXEL OF oDlg FLAT GDIP NOROUND  ; //
        RESOURCE "GRID_DWN_REC", "", LinesBmp(oBtn,50,50), "" ;
     ACTION NIL WHEN lmenu
        obtn:nClrBorder := RGB(195,195,185)

 @  70, 10 BTNBMP    oBtn  SIZE 50, 90 PIXEL OF oDlg FLAT GDIP NOROUND  ; //
        RESOURCE "GRID_DWN_REC", "", LinesBmp(oBtn,50,90), "" ;
     ACTION NIL WHEN lmenu
        obtn:nClrBorder := RGB(195,195,185)
ACTIVATE DIALOG oDlg
RETURN NIL
//---------------------------------------------------------//

Function LinesBmp(oControl,n1,n2)
   local hBmp, oBrush
   DEFINE BRUSH oBrush STYLE BDIAGONAL COLOR  Rgb(195,195,185)
   hBmp  := FW_MakeYourBitmap( n1,n2, <|hDC,w,h|
     FillRect( hDC, { 0,0,h,w }, oBrush:hBrush )
            return nil
            > )
            RELEASE BRUSH oBrush
    return hBm
I wish have all the area of button with diagonal
so how I must make to have it ?
Your function LinesBmp() works correctly (filling full area) if you created the Dialog with TRUEPIXEL clause.
Because you have not created the dialog with TRUEPIXEL clause,
make this small change in your LinesBmp() function.
Change this line

Code: Select all | Expand

   hBmp  := FW_MakeYourBitmap( n1,n2, <|hDC,w,h|
as

Code: Select all | Expand

   hBmp  := FW_MakeYourBitmap( n1*2,n2*2, <|hDC,w,h|
With this change, the bitmap covers the full area of the button.

We need to keep in mind the effect of using or not using the TRUEPIXEL clause on the dimensions of the controls.

Re: colorize btnbmp with diagonal

Posted: Fri Apr 19, 2024 11:32 am
by Silvio.Falconi
nageswaragunupudi wrote:
Silvio.Falconi wrote:I tried a test I found on this forum

Image

Code: Select all | Expand

 
#include "fivewin.ch"

// colorize btnbmp with diagonal

Function test()
local oDlg
local oBtn
local lmenu:=.f.

DEFINE DIALOG oDlg SIZE 400,400

@  10, 10 BTNBMP    oBtn  SIZE 50, 50 PIXEL OF oDlg FLAT GDIP NOROUND  ; //
        RESOURCE "GRID_DWN_REC", "", LinesBmp(oBtn,50,50), "" ;
     ACTION NIL WHEN lmenu
        obtn:nClrBorder := RGB(195,195,185)

 @  70, 10 BTNBMP    oBtn  SIZE 50, 90 PIXEL OF oDlg FLAT GDIP NOROUND  ; //
        RESOURCE "GRID_DWN_REC", "", LinesBmp(oBtn,50,90), "" ;
     ACTION NIL WHEN lmenu
        obtn:nClrBorder := RGB(195,195,185)
ACTIVATE DIALOG oDlg
RETURN NIL
//---------------------------------------------------------//

Function LinesBmp(oControl,n1,n2)
   local hBmp, oBrush
   DEFINE BRUSH oBrush STYLE BDIAGONAL COLOR  Rgb(195,195,185)
   hBmp  := FW_MakeYourBitmap( n1,n2, <|hDC,w,h|
     FillRect( hDC, { 0,0,h,w }, oBrush:hBrush )
            return nil
            > )
            RELEASE BRUSH oBrush
    return hBm
I wish have all the area of button with diagonal
so how I must make to have it ?
Your function LinesBmp() works correctly (filling full area) if you created the Dialog with TRUEPIXEL clause.
Because you have not created the dialog with TRUEPIXEL clause,
make this small change in your LinesBmp() function.
Change this line

Code: Select all | Expand

   hBmp  := FW_MakeYourBitmap( n1,n2, <|hDC,w,h|
as

Code: Select all | Expand

   hBmp  := FW_MakeYourBitmap( n1*2,n2*2, <|hDC,w,h|
With this change, the bitmap covers the full area of the button.

We need to keep in mind the effect of using or not using the TRUEPIXEL clause on the dimensions of the controls.

Nages look this differences

Without Truepixel

Image

With Truepixel

Image

the space between the lines is greater if the dialog is truepixel
Is there a method to get the lines closer together?

or maybe they are the same and I see them as different :D